...
- Start the microscope as usual but make sure the confocal software is closed
- Focus on your specimen down the eyepieces
- Enter the System Setting screen by pressing the spanner icon on the I3-TPC touch pad controller
- Press the Customized tab on the System Setting screen
- Make sure the Focus Limit Setting box is ticked and press the Detailed Setting button
- Look down the eyepiece and focus slightly above your sample; beyond where you want any Z series to end
- Press the 'All the same values SET' button to set the focus limit for all objective lenses
- Press the OK button and then press the X button in the top right to close the System Setting dialogue box
- Push the ZDC dichroic mirror (DM) lever on the left of the stage into place , so that light is reflected to the ZDC detector (see image below)

- Open the confocal software and adjust the laser, detector and scan parameters until they are suitable for your specimen
- Press the ZDC Setting button in the Acquisition Setting control panel

- In the ZDC Control window, make sure the Search Zone is set to 100 µm and the 'ZDC control executes immediately before scanning start' button is ticked
- Scan a reference plane in your specimen and press the Set Offset button in the ZDC Control panel (red arrow in image A below). The ZDC will search for the auto focus (AF) plane and will beep once when it finds it. The Offset is the distance from the AF plane to your reference plane
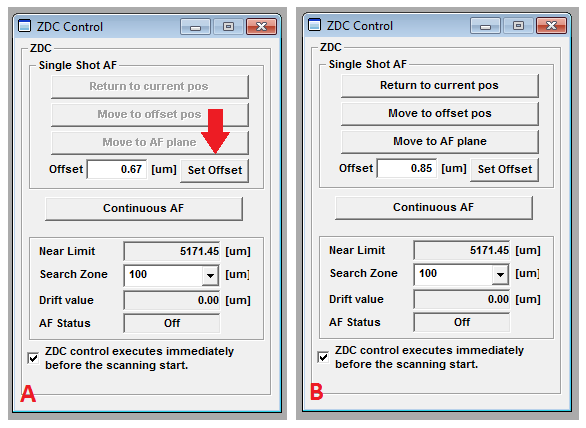
- The Single Shot AF buttons are activated once the the Offset has been found (image B). These allow you to move between your current plane, the offset position (which is your reference plane) and the AF plane, which is the reflective surface of the specimen vessel
Using ZDC to maintain focus during XYZT series
Single Shot AF mode must be used when combining auto focus with Z series. In this mode the ZDC is turned on briefly before image acquisition and then turned off to allow the focus to capture a Z stack.
- Make sure the ZDC dichroic mirror is in position and the Focus Limit has been set
- Open the confocal software and adjust the laser, detector and scan parameters until they are suitable for your specimen
- Press the ZDC Setting button in the Acquisition Setting control panel
- Tick the box that says 'ZDC control executes immediately before scanning start'
- When using the UPLSAPO 60XW (water) and UPLSAPO 60XS (silicon) lenses, make sure the Search Zone value is set to 100 µm
- Image a reference plane in your specimen and press the Set Offset button in the ZDC Control panel. The ZDC will search for the auto focus (AF) plane and will beep once when it finds it. The value that then appears in the Offset field is the distance from the AF plane to your reference plane (the Offset Position)
- Set up your Z series, marking a Start and End and setting the StepSize and Slices in the Microscope section of the Acquisition Setting control panel
- Optional: You may use the 'Move to offset pos' button in the ZDC Control panel to return to the Offset PositionBefore capturing XYZT series you must tick the 'Enable ZDC AF during Time Series Scan' box in the Acquisition Setting control panelIf you want to capture a time series of a single plane (no Z) then you just need to make sure the Offset Position is the plane you're interested in. Alternatively, you could use the ZDC in Continuous Mode
Using ZDC in Multi Area Timelapse (MATL)
...