...
- Start MATL and set the Offset as described in the instructions for Single Shot Mode above
- Set the Z series Start, End and StepSize if required
- Return to the Offset Position by pressing the 'Move to offset pos' button in the ZDC Control panel
- Add the current position in the Multi Area Time Lapse Controller
- Move the stage and add more positions
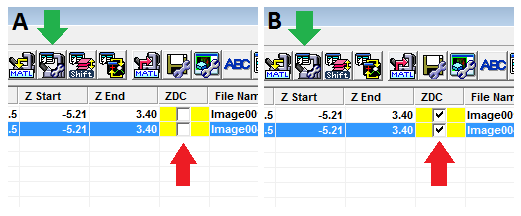
- Tick the ZDC boxes in the Registered Point List (red arrows in images below)
- Select the first point on the list and open Edit Acquisition Parameters...(green arrows above)
- Click the Set To Others... button to apply the Z series settings to all points
- In the TC[Set To Others Selecting] window, the 'ZDC Search Zone' box should be ticked
- The 'Z Position' box should not be ticked unless you want all the Z positions to be set to the same as the first position
...
- Set the Offset as described in the instructions for Single Shot Mode above
- Press Continuous AF in the ZDC Control panel
- The ZDC locks onto the AF plane, but this won't necessarily be the plane you are interested in
- Scan your specimen with Continuous AF on
- Press the Continuous AF tab on the I3-TPC touch pad controller

- Press the Fine button on the controller to activate the fine focus (The red arrow in the image indicates the position of the Focus Limit)
- Adjust the focus until the plane of interest is in focus
- Press the Fine button again to reactivate the Continuous AF at this new position
- Start your imaging (AF status will show “Focussing” throughout the entire image acquisition)
...