Introduction
Lecturecast (Echo360) has introduced in-app notifications, tailored to highlight the most relevant information for you. These notifications can be customised based on your preferences and priorities. Look for the Notification icon located in the upper-right corner of your Lecturecast (Echo360) toolbar to access these notifications.
It involves:
- To enable notification
- Choose who you want to trigger the notifications you receive
- Choose what you want to trigger the notifications you receive
- To View Notifications
Each user can customize notifications from the Account Settings page, as illustrated in the figure below. Additionally, these in-app notifications, being user-specific, won't alter or replace any email notifications set up by your organisation; they'll complement the existing email notifications.
1. To enable notification
Log into Lecturecast (Echo360), click the Settings icon and then choose Account Settings. In the Users Settings page, click Notifications from the menu on the left and enable the main notification toggle next to Notify Me About.
Once you activate the main notification toggle next to "Notify Me About," you'll start receiving notifications for all the options displayed in the screenshot. To tailor your notifications and specify what triggers them, please refer to the instructions provided below.
2. Choose who you want to trigger the notifications you receive
Once notifications are enabled, you have the option to fine-tune what you receive by selecting who triggers your notifications. For instance, you might prefer not to receive notifications for actions you've personally performed within the system, as you're already aware of those actions. Conversely, you may opt to consistently receive notifications for your own actions as a reminder or for double-checking your work. The available options for groups include:
| System | These are actions that are system-generated or automatic. They may include processing scheduled captures, transcripts becoming available for content published into a section with ASR (All Section Content) toggled on, etc. |
| Administrator | These are actions that an Admin in the system has taken. They may include an Admin manually reprocessing content, archiving content, ordering closed captions, etc. |
| Other | These are actions that other non-admin users (instructors, schedulers, etc.) in the system perform. They may include a student creating a new Q&A post in your course, a TA creating or editing a transcript, etc. |
| Me | These are actions that you trigger within the system. They may include deleting your content, ordering a transcript, responding to a Q&A post, etc. |
3. Choose what you want to trigger the notifications you receive
Once notifications are activated, you can customize your preferences by selecting the types of events that trigger your notifications. For instance, you might prefer not to receive notifications for media processing events if you already receive email notifications for these occurrences. Conversely, if you frequently work within EchoVideo and prefer not to check your email as often, you may choose to always receive processing notifications. The available options for events include:
| Processing Started | Enable this to get notified when media has started processing. You can choose to get success notifications, failed notifications, or both. |
| Processing Complete | Enable this to get notified when content becomes available for viewing / editing. You can choose to get success notifications, failed notifications, or both. |
| Management | Enable this to get notified when content is deleted / soft deleted, archived, or restored. |
| Engagement | Enable this to get notified when there is new engagement activity from a learner, teaching assistant, or another instructor in one of your courses. |
4. To View Notifications
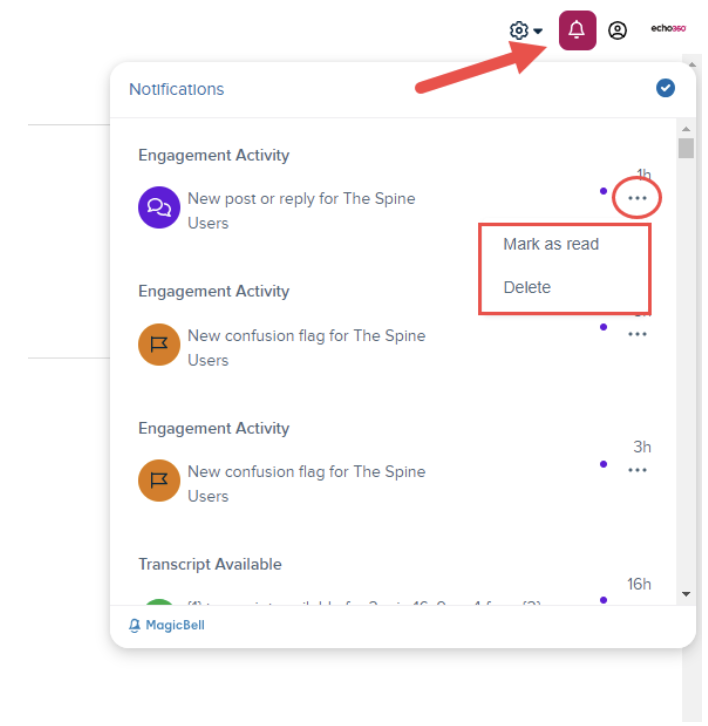
Click the Notifications icon, scroll to browse notifications that you have configured and optionally take the following actions:
- Click on a notification to be taken directly to the related media.
- Click the menu button to delete or mark the notification as read.
- Click the white checkmark in the blue circle to mark all notifications as read.

