A quick guide to capturing images with Openlab
Openlab is a camera capture software for Apple Macs. I don't recommend learning to use Openlab if you are a new user because development of the software stopped in 2010. The software still works on Macs running OSX up to and including version 10.6.8 but not newer versions, so if a computer running Openlab is replaced or if the version of OSX is upgraded then Openlab will stop working. In that situation you would then need to learn how to use another capture software. Any data you have in Openlab format can still be opened and converted into other formats using Fiji and other software.This is intended as a quick guide to getting started in Openlab. More information can be found in the Openlab user guide.
Make sure the camera is switched on before opening Openlab, then click the Openlab icon in the dock.
![]()
Openlab user interface
The Openlab interface consists of a main menu, a document window and several free-floating palettes. The adjacent image shows the menu and document window. The document window has a bar on the left with tools that you can use to get a live preview (the screen icon), capture images (the camera icon), digitally zoom on images, colourise them, etc. Initially the document window will be empty but the live preview and captured images will appear in here. There should be a few free-floating palettes. The most important ones are the Video Controls and Layers palettes. If they aren't on the screen they might have been closed or minimised to icons at the bottom of the screen. You can open them again by going to Windows in the main menu and selecting Palettes. All the available palettes will appear in a drop-down list but you only need the ones I've mentioned.

Video Controls and Layers Palettes
The Video Controls palette is where you set camera controls. The exact controls in the palette will depend on the camera but the most important parameters are exposure, binning, gain and auto contrast, although Openlab does not support auto contrast for all cameras. The layers palette is where icons of your images appear as you capture them. When you first launch Openlab there are only two icons in the palette, a blank white Original Image icon representing the empty document window and the Video Preview icon. If you click the Video Preview icon then the document window will display a live image of what the camera sees. Clicking the icon does the same thing as clicking the live preview tool in the document window tool bar. When you click the camera icon in the Document Window tool bar a 'captured layer' will be added to the icon list in the Layers palette.

Colourising images and creating colour merges
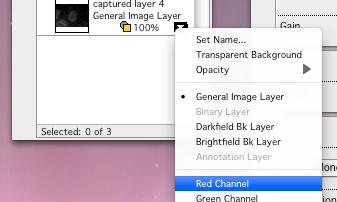
Clicking on the little arrow on the right of a layer in the Layers palette opens a drop-down list where you can pick a colour from red, green and blue to apply to the layer. Once colours have been applied a new merge layer can be made by selecting the layers you want to merge and dragging them to the New button at the top of the palette or selecting Merge to RGB from the Layers menu.
A bright field image can be merged with fluorescence by placing it above the fluorescence layer in the palette, changing its opacity and then selecting Merge to Composite from the Layers menu. Colours other than RGB can be applied using the colour swatch in the document window tool bar.