This microscope is equipped with a Airyscan unit, a novel detector from Zeiss which can acquire images with up to 8x improvement in Signal to Noise ratio and 1.7x higher resolution than a conventional confocal. For more information on how it works, please read the Zeiss Technical Note.
- It is not possible to use Smart Setup to configure the Airyscan imaging setup on the LSM 880.
- To use the Airyscan, check the ChA detector in the scan control.
- Select an appropriate filter to separate the fluorophores being used.
- The Plate needs to be in the light path to send light to the Airyscan.
- You will need to create a separate Track for each Airyscan channel. There is only one Airyscan detector, so acquisitions must be made sequentially. However, it is possible to set the dichroic mirror and filter positions in such a way that they don't need to move between channels (i.e. the equivalent of Smartest mode in Smart Setup).
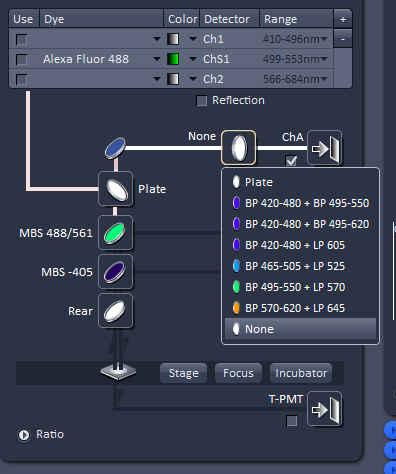
- Zoom needs to be set to at least 1.8. The pinhole automatically adjusts to twice the airy unit in order for all the light to go to the detector array instead of being eliminated by the pinhole.
- To align the Airyscan set the frame size to 512 x 512 and scan speed to maximum. Set the laser powers to 0.5 to 2% and the gain to 760 to 800.
- Tick Detector View. This will allow you to optimise how well the light is aligned with the Airyscan 32-channel array.
- Make sure only one Track is ticked in Channels. This because you can only align one channel in the Detector View at a time. Make sure this is a visible channel (e.g. 488, 561, 633) and not an invisible channel (e.g., 405, multiphoton).
- Move a bright part of your sample to the centre of your field of view.
- Go to the Maintain tab, and click on AiryScan. Check the "Adjust in Continuous Scans" and "Weak or Sparse Samples" boxes.
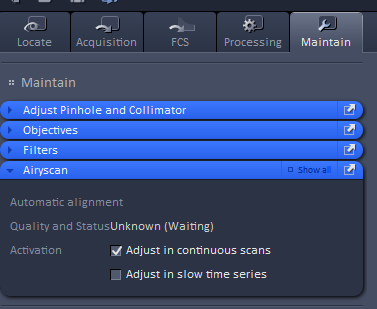

- This allows the the scanner to centre the airy signal on the 32 detectors. Once this is centred and you can see the bright spot in the centre of the 32 detectors as above, uncheck the 'Adjust in Continuous Scan" box. This is to avoid the Airyscan continuously re-centering unsuccessfully when you scan less bright samples.
- Repeat this process for all channels, unticking the other Tracks so you can align each channel separately.
- It may be that the invisible channel (specifically the 405 laser) does not align correctly. If that is the case you will have to manually adjust the pinhole alignment for the invisible channel.
- Align the visible channels as above, then untick 'Adjust in continuous scans'.
- In Maintain, expand 'Adjust Pinhole and Collimator'.
- Write down the current positions for PosX InVis and PosY InVis, preferably in a text file with the current date.
- With the invisible track ticked in Channels and the Detector View visible on screen, scan the specimen in Continuous mode and manually adjust the PosX InVis and PosY InVis slider positions until the signal is in the centre of the detector.
- Click Store Current Pos in the Pinholes section (NOT the collimators section).
- You can now go back to the Acquisition tab and optimise the frame size for Airyscan acquisition, slow down the scan speed for improved signal to noise ratio and adjust any other settings necessary before starting the image capture.