Learning Lecturecast Basics
Introduction
The information contained in this training guide is designed to give Lecturecast Instructors (Moodle Tutors and Course Administrators) a brief overview of the Lecturecast (Echo360) at UCL. The focus of this training guide is Lecturecast (Echo360) which is the tool used to view, edit and manage classroom content including video recordings.
It includes:
1. Moodle and Lecturecast role mapping
2. Working with the media library page
3. Working with the courses page
4. Working with the course section page
- Video recordings need to be scheduled via the Lecturecast Scheduler to ensure they are captured during the lecture. Access the Lecturecast Scheduler to schedule Lecturecast recordings and refer to the Lecturecast Scheduler Create and Edit a Lecturecast Schedule training guide if required.
- It is important to remember that the current Lecturecast system is intended for taught material only, delivered to UCL students. The service no longer supports external public linking to material (meaning a UCL login is now required to view) nor does it support the hosting of content that is not related to taught module/programme delivery. If you have any content that needs to be viewed by non-UCL staff or students, or material that is for an audience other than students on taught modules/programmes, then the material will need to be hosted on UCL Mediacentral. This can be done by downloading content from Lecturecast platform and then uploading the content to Mediacentral.
- Instructions for downloading material from Lecturecast
- Instructions for uploading media to Mediacentral
- This page is not covering every feature/aspect of Lecturecast (Echo360), for more guidance please visit their official guidance webpage Support (echo360.com).
1. Moodle and Lecturecast role mapping
There are two user roles within the Lecturecast (Echo360) and this is based on what role you have on Moodle. For instance, any Moodle staff roles with Moodle editing permission will be granted the instructor role on Lecturecast, but any other Moodle roles outside of that will be granted the student role.
- Lecturecast Instructors can create and upload content, and work with classroom tools to enhance the student learning experience.
- Lecturecast Students can add their own notes, flags and bookmarks to content and participate in classroom activities.
2. Working with the media library page
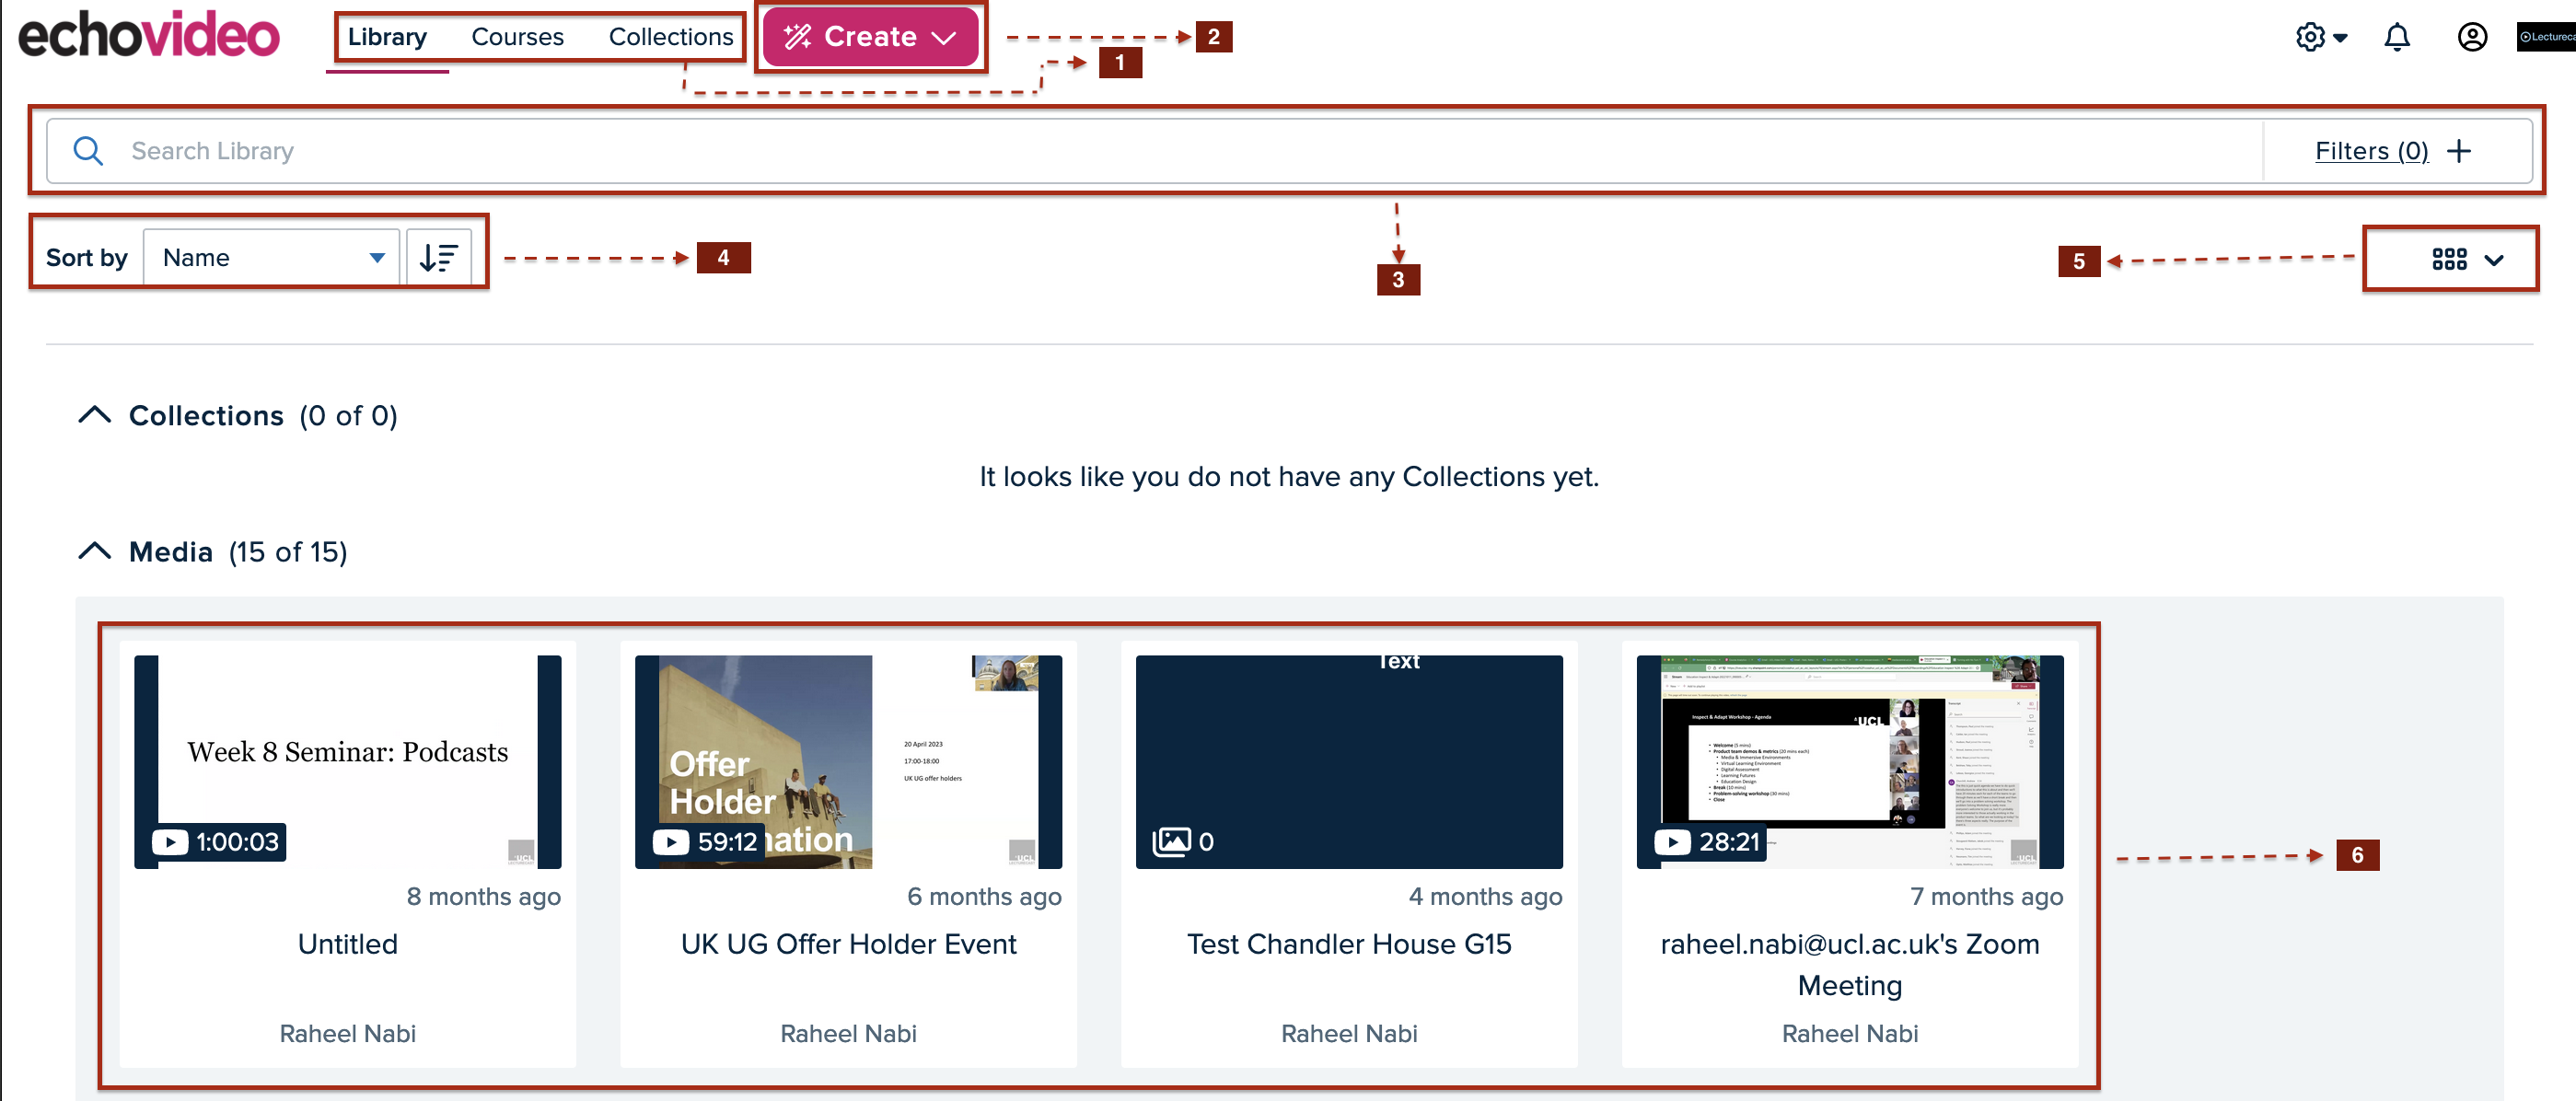
If you logged into Lecturecast Echo360 directly, you will encounter the Library page first. This is where you will see all your video/recordings which you have ownership of. However, If you enter Lecturecast Echo360 through Moodle, you most likely follow a link that puts you on the Course Section page for the course. For guidance on the Course Section page, please click on this link (Working with the course section page) to skip to that section.
| 1 - Main menu options | Media Library page - This page provides a single content management location for your media. Courses page - This page display courses in the currently active (or most recent) term that are shown first, in alphabetical order. Collections page - This feature is currently not enabled. |
| 2 - Create | New Browser Capture - Capture recording via your web browser, it will use your webcam and computer microphone to do the recordings. New Capture (Universal capture) - This option requires the download of a software Upload media -If you already have a pre-recorded video on your device, you can choose this option to upload it to your Media Library |
| 3 - Search library | Search Library is a text box that allows you to search for media or a collection by Title. Begin typing in the box, and the Library filters the contents to display only those items where the typed text matches the text in the title. |
| 4 - List/Grid view options | This option allows changing your media tiles into a list view or grid view. |
| 5 - Sort options | This option allows you to sort your media contents either by created date or by name in alphabetical order. |
| 6 - Media tiles | The media tiles are the media you have access to outside of your courses, meaning you can view the media without having to navigate into a course or classroom. This includes media you own, media that someone has shared with you |
3. Working with the courses pages
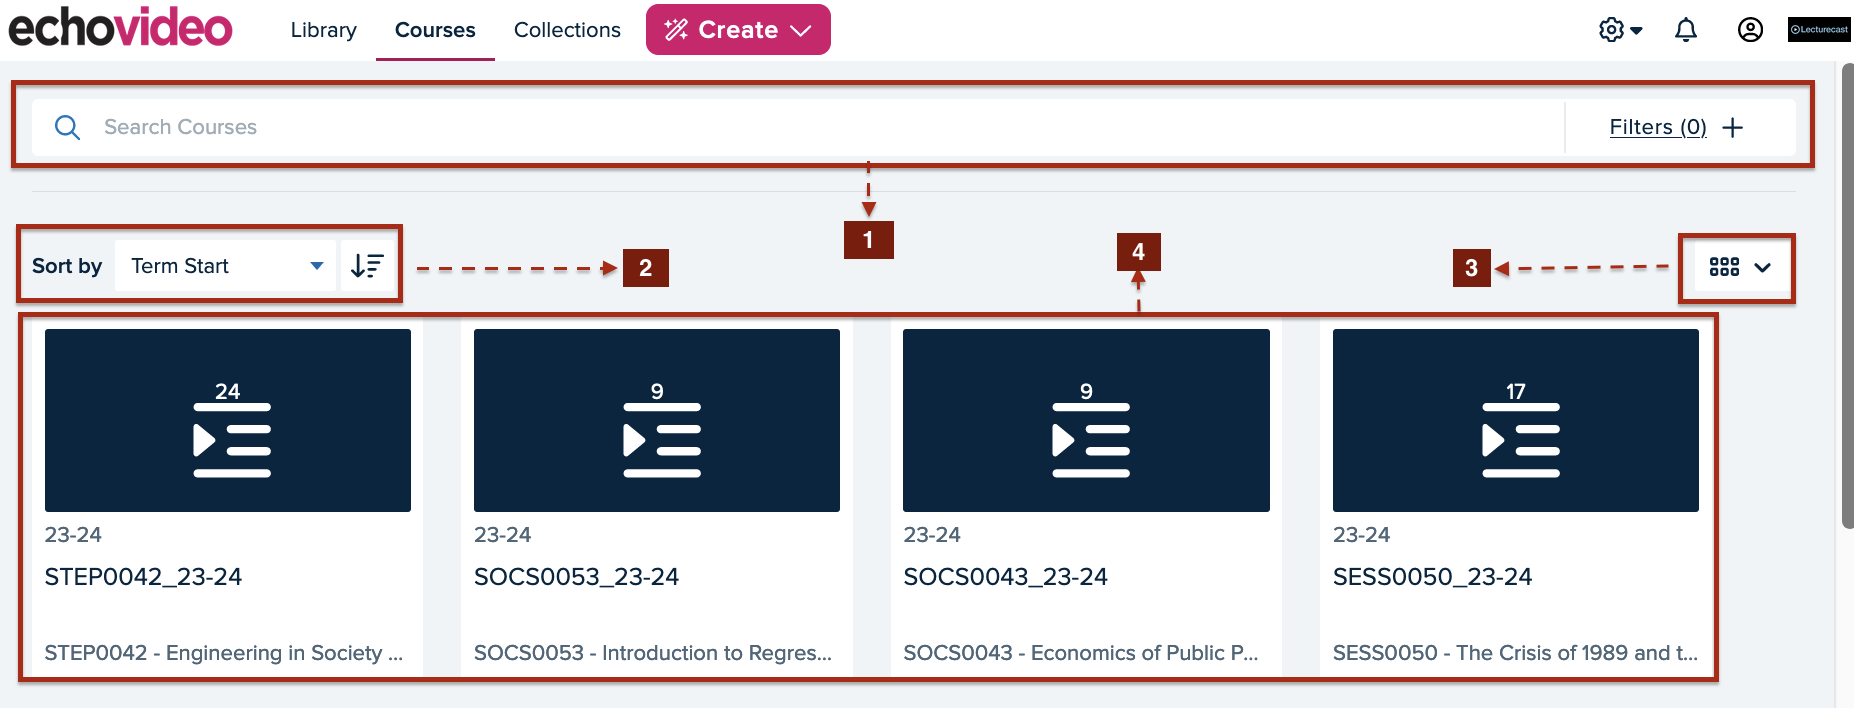
If you log into Echo360 directly, you can access your courses from the Courses page. Click Courses from the top menu bar. This page is very similar to the Media Library page above so the table below will exclude any elements that are already covered in the first section. By clicking on one of these course titles it will take you to the course section page (Working with the course section page).
| 1 - Search courses | Search courses is a text box that allows you to search for courses by Title. Begin typing in the box, and the Library filters the contents to display only those items where the typed text matches the text in the title. |
| 2 - Sort options | This option allows you to sort your media contents either by term start or by course name in alphabetical order. |
| 3 - List/Grid view options | This option allows changing your media tiles into a list view or grid view. |
| 4 - Course titles | This is where all your courses are listed. |
4. Working with the course section page
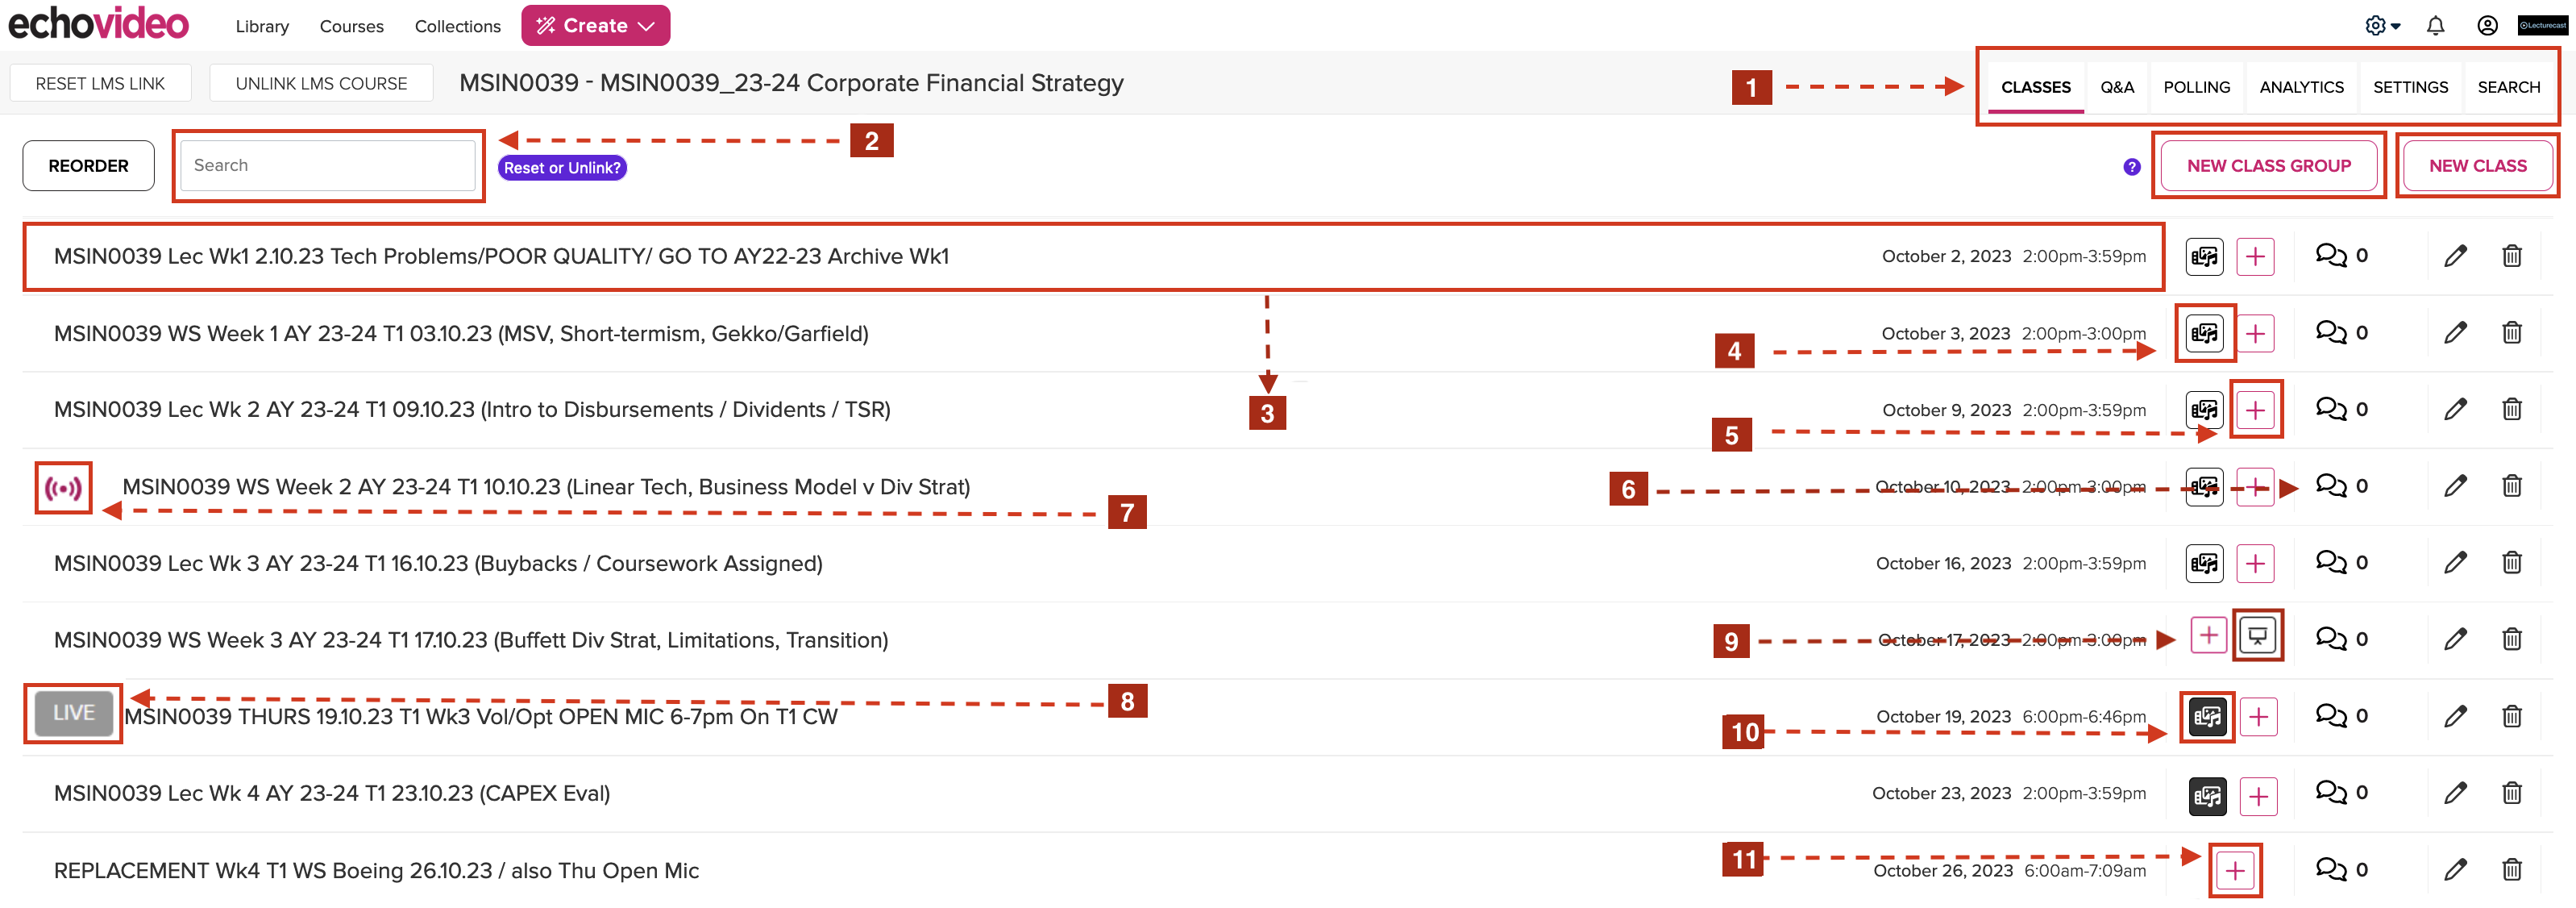
If you enter Lecturecast (Echo360) through Moodle, you most likely follow a Moodle LTI activity link that puts you on the course section page just like the one above that is associated with the Moodle course. The course section page contains a list of classes. Each class can contain up to a video, a presentation and an audio track. Clicking on one of these classes will take you to the media page which shows you the lecture recording of that class, where you can edit and interact with the video recordings. see (Working with the course section page).
| 1 - Menu options | Classes - This is the default tab which shows you a list of classes associated with the relevant Moodle module. Q&A - This tab allows you to access the Discussions/Q&A panel is one way to both encourage and monitor student questions, responses, or other relevant posts in the classroom. For more guidance on this function, please visit this Lecturecast (Echo360) the official webpage (Monitoring Q&A in the Classroom – Teaching & Learning (echo360.com). Polling - This tab is where you can view student responses to interactive media polls if it has been set up. For guidance on this function, please visit this Lecturecast (Echo360) official webpage(Viewing Responses to Polls in Echo360 Course Media – Teaching & Learning). Analytics - This tab provides a lot of information regarding student engagement and classroom participation. For guidance on this function, please visit this Lecturecast (Echo360) official webpage Course Analytics - Overview – Teaching & Learning (echo360.com). |
| 2 - Search contents | Search contents allow you to search any class content within this course section. |
| New class group | Class Groups allow you to put these classes together in a larger set so that you can associate as many pieces of media together as you need to, into a single class group topic and order. For guidance on this function, please visit this Lecturecast (Echo360) official webpage (Creating Class Groups for Similar Classes in your Echo360 Course – Teaching & Learning) |
| New class | New class allow you to create new classes where you can upload your video and presentation file manually. For guidance on this function, please visit this Lecturecast (Echo360) official webpage (Adding a Class to an Echo360 Course – Teaching & Learning). |
| 3 - Class | Each class can contain one video and one presentation, OR one interactive media. |
| 4 - Media button | Clicking on the 'Media' button will allow you to take various actions to the media (lecture recording), such as creating a copy of the recording or making the video available to your students etc. For guidance on how to use this function, please visit this official Lecturecast (Echo360) webpage (Magic Class List Icons – Teaching & Learning (echo360.com). |
| 5 - Add presentation button | The 'Add presentation' button allows you to add media to a class such as Powerpoint presentation slides. However, it will overwrite your existing presentation slides as each class can only contain one video and one presentation slide. For more guidance on how to use this function, please visit this official Lecturecast (Echo360) webpage (Adding or Uploading Presentation Slides to a Class – Teaching & Learning (echo360.com) |
| 6 - Question and Answer button | This 'Q&A' button has the same function as the Q&A tab above, it allows you to access the Discussions/Q&A panel is one way to both encourage and monitor student questions, responses, or other relevant posts in the classroom. For more guidance on this function, please visit this Lecturecast (Echo360) official webpage (Monitoring Q&A in the Classroom – Teaching & Learning (echo360.com). |
| 7 - Raspberry signal icon | This icon serves as an indicator for both lessons that are currently taking place and those that are enabled for live streaming. |
| 9 - The presentation screen icon | The right "Presentation screen" icon on the right is for presentations / slide decks. |
| 10 - Grey 'Live' button | The grey 'Live' button indicates that there is a future scheduled capture, but it has not happened yet. |
| 11 - Grey Media button | The grey 'Media' button indicates that there is a future scheduled capture, but it has not happened yet, so you will not be able to interact with this icon until it is turned dark grey. |
| 12 - A Raspberry plus icon | A Raspberry plus icon allows you to add media to this class. If shown alone for a class, you can add a video, a presentation, or a piece of interactive media. |


